Archive for the ‘Wood Projects’ Category
EVA Comparison for Rods
White is a recent purchase from Mudhole and the others are older samples (5 years) from NERBS (who now only sell blocks, not cylinders) (I believe NERBS is now ThreadCentral).
The edge lighting illustrates the rough and poor density from Mudhole, and I will note it is difficult to create a fine finish, as issue is with the grain itself, and not the cut provided. You need to apply a soft pressure light sand with fine paper.
End cut illustration, and please note that cuts shown on the green and yellow block are “mine”.

.
Illustrating round roughness.

.
Close-up illustrating cell gaps and uniformity.

.

.
.
Q1: Is the “quality” difference sufficient to be concerned? A: IMHO: Yes, for a fine custom rod, were finish is important. If you are using a high quality cork, then this is a mis-match.
Q2: Is there a consumer price difference? A: No.
.
It appears most of these blocks come from China, and I have no idea how many OEMs are out there competing; but it is probable they are being purchased / competing only on lowest price.
,
🙂
,
a new Shaving Brush
- Wood is an offcut from a local Maple Burl, which included some minor voids.
. - Turn on my lathe using a 1″ Hamlet German Spindle Gouge and a 3/4″ Hamlet Skew Chisel. The German Gouge is infrequently seen. but I find to great for rounding the stock and getting to the shape I want.
, - I use Bealls Internal Collets for the final work on the base, and finishing,
. - Finish is 6 coats of CA (superglue), and then polish with micro-grit pads to 12000. My mutli-year experiment-experience with CA as a durable finish is positive.
. - Knot is a Shavemac SilverTip 2 Band 22mm Knot with a 2mm reduction in the loft. As this is not my first Shavemac knot, I am happy to stat, though not cheap, there are worth the expenditure.
. - The ability to make a handle, allows one to make a handle that is functional and comfortable!
.
In the background are two other brushes that have serve well: Vulfix and Thater. Both of which are comfortable to use and great tools.

.

.
Comfortable to hold.

.
The famous Simpson Chubby. Great knot (brush), but it really is not comfortable to secure in your hand, as you whip up some shaving soap in a bowl. Its fundamental flaws are:
- Holding area is too shallow in depth.
- Holding area is too harrow to get your fingers down, and I have a small hand
In effect, you have to hold this brush like a club, and thus it is regulated to when I want to build the soap-lather on my face, and not in a bowl.

.
Final comment, having experiment with shaving brushes for 10 years now, what are my comments:
- Vulfix Old-Fashioned Brushes are comfortable to hold, but it is hit-n-mass on the brush itself (one good, one bad). I replace the bad knot with a ShaveMax.
- Yes to the Shavemac 2 Tone Silvertip knots.
- I prefer knots made 18-22 mm in diameter (at the base)
- Thater is excellent.
.
And far as shaving soap and creams, my preference is Castle Forbes Creams and Barrister and Mann.
I do notice that Barrister and Mann has a much smaller stock of soaps and aftershaves now, versus 4+ years, so I probably need to cherish my Seville Orange Soap and some of the aftershaves (Vesper and Nocturne (being Judy’s favourites))
🙂
Lathe Handle – simple secure comfort
A picture summary of the latest lathe handle, illustrating my “new” tradition of well defined well and the pronounce step, that enables an a positive relaxed grip as my hand moves up and down the handle.
The handle is made from birch and I applied 6 coats of blonde shellac.


.
🙂
.
Reg Barber Tamper – refurbish
After 10 years, our wood handle coffee tamper looked pretty rough. So, I did take some time to refurbish it,
- Masked the logo with tape.
- Unscrew the handle from the base.
- On the lathe, lightly sand off the finish.
- Clean it up to 320 grit (Mirka)
- Raise the grain (water) and dry
- Sand from 320 to 600 dry.
. - Created a holder to hold the tamper using the 3/8 screw in the base.
- Apply a new mask to the logo.
- Rub in by finger Tru-Oil, then dry,
- Level (lightly sand) the finish with 0000 steel wool, and then wipe clean.
- Repeat Tru-Oil and Level, two more times.
- Apply two Tru-Oil cooks, and level.
- Apply final coat of Tru-Oil.
- Remove mask.
- Turn on lathe and run with a old t-shirt.

,

.
We are serious about our coffee.
Oh yes, my preference is the c-flat shape and I think I prefer the stainless steel variant (but brass or steel is very good).
🙂
.
Record 077 Tuning
This one of my Record planes (bought as new from Lee Valley many years ago), and with time I have tune to be a pleasurable tool, versus a rough inclined chisel. In short, the 3 key steps taken to make this a really good tool:
- Always keep the nose on. If you need a chisel plane or use a chisel with a piece of wood to guide you.
. - Flatten the sole with the nose permanently on, and be prepared this will take time (more than one night). I started with 100-micron paper on glass and finished with a Sigma 3000 ceramic.
.
(I did not have to correct the hold-down, but I did inspect it)
. - Replace the original cheap blade, with a good blade in a rebate shape – flat sides (forgo the bevel edge). This blade was made to order for me by Ron Hock and is solid (no chatter).
.
It is funny – funny sad – that such a solid little plane with such mass-density, is supplied by Record with a poor blade. Is this the spot Record should be trying to save a penny.
So this post is in contrast to the L-N post earlier. As illustrated, the Record can be tuned to be a pleasure to use, but the effort and time to get there is substantially more than a Lie-Nielsen.


The experience with the Stanley Block planes are the same, you can get them great, but it takes time and effort.
🙂
Tuning a Lie Nielsen Rabbet Block Plane

Some shavings from last week, using my hand rabbet plane.
I have several Lie-Nielsen and the good news to proclaim: as the planes are true, the effort and time lost to start is low. I recall my first Record plane many years (decades ago) and the effort to get it true and sharp consumed many hours.
Though, I have had no major issues with the L-N planes that has wasted time, I note some attention should be taken to look at the shoe (gap) (takes < 5minutes to adjust), the chip-breaker (again <5 minutes) and then the plane blade.
With the latest Lie-Nielsen plane, a Jointer 7, the associated shoe placement was perfect, same for the chip-breaker and the plane blade was flat and sharp. All I needed-wanted to do was apply a micro-bevel and strop the blade, and I was able to produce fine cuts.
More common, I have had to spend 30 minutes to improve the blade – first flatten, then sharpen and hone.
Never-the-less, these planes have proven to able to get to the wood quickly, without too much fussing.
It should be acknowledge, what is flat enough and sharp enough is subjective. For me, it means the blade can easily shave the hair off my arm, and the plane can with joy, shave a fine curl.
🙂
Custom Handle for Lathe Turning Tools
I have collected a few different tools for the lathe over the years and will declare I do like Hamlet Tools and avoid the Henry Taylor (destined for the next garage sale). I few other tools that I do use – Carter and Son Bowl Gouge and a couple of EasyWood Carbide Scrapers.
My quick practical review of these scrapers …
- Easy to use, but you can cut better with traditional tool. But you need to put in time with traditional tools, and maybe I should say you are always learning with traditional tools to get the best cut.
- For comfort and handling, unless you are doing small work, get the full size tools.
- I like the handles, and I have some suggestions on improving the shape.
- Make the transition to the back handle more define to allow your hand and fingers to register the grip,
- Increase the thumb depression and place it such that your thumb connects on the rise.
Like comfortable single handed flyrods handles that are used to power the cast, keep the diameter wide (1 to 1.5″), so you have an open grip when you hold the tool. A narrow grip requires you to close and compressed to have a firm hold of the tool. This compressed grips adds strain and tightens your wrist; thus harming the flexibility and control of the tool-cut.

An illustration of the grip, including my dirty hands and fingernails (sorry).

🙂
Sharpening Pfeil Gouges
I note, there is a similar posting by David Fischer titled as “What’s Wrong with Edge” > https://davidffisherblog.wordpress.com/2016/07/28/whats-wrong-with-this-edge/
but with excessive hand polishing, with each Pfeil gouge, you need to make a decision on receipt, use as is, or correct for the excessive hand polishing. As you can see in these images of the Pfeil 7F 14, the polishing was not true and as David note there may be a micro-bevel or worst there may be edge rounding (id est, look nice, but dull).
So with each gouge, I do a quick cut. If if works well, I just hone with leather and continue, with the knowledge I will have to address the edge at a later date.


I use a soft spot to highlight the bevel to inspect, and as above, it illustrates there is a bevel.
In this case, the gouge cuts fine (enough), so I moved into my tools after a hone on the leather. And though the bevel is not true, I am carving (learning to) free-hand, so I do not find it harmful.
So what happens, if the edge does not cut well (or when the edge needs to be dressed), I will reshape the bevel on an aggressive stone for small tools or for larger gouges on a 8″ CBN wheel. From there, I work through the ceramic stones from 1000 to 10000 (my finest), with a final hone on leather.
.
Follow-up showing a Pfeil 7L 30 Gouge that has been sharpened by me from a CBN wheel and all the way to a strop – it is not as polished (mirror finish), but it is sharper with a consistent fine edge.


Notice the spot highlight is not just at the edge. As you look up the bevel, you can see where the hollow grid is, and though it is present, it is small and far in from the edge that matters.
.
Q: Do I believe a carving tool should have a micro-bevel?
A: No. Remember, carving is new to me, but as bevel is part of the reference surface to form the shape, a micro-bevel pulls your edge away from the reference plane you are cutting to. As such, a sharpen bevel is a nuisance that outweighs its benefits.
If the bevel is small enough, and appears not to harm my work (in my test), I will leave it in-place to start, but it will disappear.
Please note this discussion is in reference to carving tools only, and I enjoy the benefits of a small bevel on chisel and plane blades (including spokeshaves). In these case, you are NOT harming the reference surface you are attacking.
Yes, I have probably thought about this too much? but this is is why I have a blog, for the effort to create the blog forces me apply a discipline of care, thought, organizing and then communicating a set of cohesive thoughts. Though soemtimes my grammar sucks.
.
Oh, WordPress has added many features, recently, but as I have not learned the changes from the simple editor tools to many embedded objects, I finding some simple tasks difficult, including embedding a link and controlling an image alignment, et cetera.
.
Spokeshave Sharpening
The good news about sharpening my Lee Valley (Veritas) Spokeshaves (large flat with O2 blade, and standard (small) curve sole with PMV11 blade is that little work is required to get it ready. True to Veritas words, the blades and machine surfaces were true and flat, with an edge at a 30 degree angle and was ready to go. Though, they did recommend a hone.
So my attention was as critical as ever to validate the claims, but the effort required to tune-up was minimum. So what was done?
- The only remedial action I took, was to reduce a small rise in the “cap” edge of the large spokeshave using a DMT fine file – freehand.
. - Otherwise, the quick flatten session was:
- I flatten the flat sole on a ceramic Sigma 3000 stone.
- I flatten the blades on a ceramic Sigma 10000 stone.
.
- Hone the blade using the Lie Neilsen Homing Guide with Long Jaws on 10000 stone.
- Apply a small micro-bevel on the same stone.
- Hone on leather.
And thus achieving a edge that shaves the hair off my arm easily.
.

.
I am not into “reviews”, but will state that I was very happy with the large flat that I bought another (with the curved sole for handle making).
.

Atkins 5 Cabinet Scraper
On a similar subject, previously I reformed one of my wife’s uncle old tools. This belongs to a set of tools that sit idle for decades (in damp locations), and sadly some of these precious tools were too rusted to save. The tools had some emotional attachment to the wife, and she was reluctant to acknowledge (still is) that tools deeply pitted do not allow for fine work.
One of the tools I was able to restore was this cabinet scraper, but it did take hours of effort to clean, flatten and tune up. It is now capable of taking very fine shavings, and the examples below are from hard maple.

.

.
I did replace the sheet metal with a heavy Ron Hock Iron made to order (replace the thin rusted blade), though the viable alternative would have been used some thin metal from an old used Japanese saw blade cut to shape to create a scarper.
Both the blade and sole required alot of attention to flatten. Next time, I would try and experiment with some 3M 100-micron abrasives.
There is not a lot information on this scraper in historical records, other than it was probably made in Ohio and before the 1950s. The bar and possibly the screws are not the original.
The screws threads I cannot identify, so to replace the screw, I would have to re-tap new threads, and the replacement bar is dissimilar that it cause severe rust and pitting on the blade that was previously there. I covered the bar with thick 3mil heat-shrink.

It is a good working tool now, and does produce a fine finish on hard maple.
I have consider getting some fine sheet stock or fine in art supplies some thing stock to help set a very fine protrusion of the blade below the sole.
.
Two Cherries Chisel – 2mm
As I continue my journey on fine woodworking, I recently acquired two narrow chisels for joinery, in this case a German Two Cherries 2mm and 4mm.
I continue to maintain no allegiance to tools – woodworking or fly-fishing – and this blog is a just my experience and observations to look back on (and others may benefit from).
Why Two Cherries?
- Availability – few have a small quality 2mm chisel.
- Previous experience – handle is fine.
- My concern, based on past Two Cherries chisels is they over polished the blades.
More Details
- The Edge. I was able to by unpolished chisel out of Germany, but there was still some rounding and some dressing of the edge was necessary.
- The edge was shipped at 25 degrees.
. - The Handle. I like the shape – flats and bead – as it does register well in my hand; but the labels (barcode and brand) can be annoyance, especially as they are not well applied. I removed 3 of the 4 labels, and clean up the glue residue. In doing so, I removed the finished, which would indicate the handles may be a combination of a light shellac and-or (just) waxed. As I have no interest in maintaining a specimen for show, I am fine with this.
. - Grip – whether it is a one hand or two hand grip, the chisel is comfortable to hold and use, and I do appreciate the machine flat pad on the blade itself (hear the handle).
. - I would note to date, the only chisel or gouge that I have ever received that was ready for final hone and go, was from Lie-Neilsen.
.
What action did I take to make it a good tool? (shaving sharp)
- Clean up labels and handle.
. - Using Sigma Ceramic Water Stone of 3000 and 10000 stones to flatten the back. I am okay with (and even prefer) a fine hollow 1cm back from the front edge, but I am looking for a true front and side edges.
- There was very little distortion on the back (good).
. - To remove the front edge rounding > I set of the chisel to a depth of 31mm on a Kell Small Honing Guide and flatten the face at 25 degrees. I started with a Sigma 1000 and finished with a Sigma 3000.
- Please note: I place the chisel on top of the guide rods.
. - Adjust the depth on the guide to 26mm, and then create a final edge at 28.5 degrees, starting at a Sigma 3000 and then finishing with a 10000.
- If with time, I find I am sharpening them too much, I will increase the secondary bevel.
. - If I expect to use this tool for hand cuts on Cherry and Maple, but if I going to use this with a mallet, I would adjust the angles of 30 to 35 degrees from the start.
- As this chisel is closer to being a firmer chisel with its strong back, I may eventually redress the bevel to 30 and 35.
. - Then hone on horse leather.
.
Would I consider another fine (narrow) chisel from another manufacturer?
Maybe. The Two Cherries is closer to a firmer chisel with it strong body and little bevel edge; but this is a common trait when you get to narrow chisel. I would consider looking at a Ashley Iles or Lie-Neilsen if-when I wanted-needed a finer side edge. But I rather inspect them before I bought them, as most narrow chisels at this width have a stout edge, so there may be little to gain.
I would also add, I bought years ago a Hirsch (same owner as Two Cherries) 16mm chisel from Lee Valley. It can be said:
- Over polished and some secondary blade finish was applied – not good.
- Has stout edges, good if you are using it with a mallet.
.
Polished Two Cherries (or Hirsch?) – say No
Simply, no. The actions taken by Hirsch and Two Cherries to polish their tools to look pretty on the retail shelf, alters the blade too much. The effort to make it a good blade and the risk of shape deformation is too great of a risk.
If you want a Two Cherries or a Hirsch tool, start with a un-polished tool, and sharpen from this point.
This is not a review!
There is alot of good information on the internet, but sadly most “reviews” are junk marketing with no real definition of good-bad nor reflect real experience with a tool.
This should be seen as just what it took me to be happy with this tool, such that I will use it. Before this posting, I have made a respectable narrow mortise into birch, and would contend the quality of the mortise is a function of me (and I was not hampered by the tool). But one good mortise and a few other decent cuts into ash and maple, does not make this a review.
.

Above, the 4mm Sharpen in the Kell Honing Guide, clearly illustrated the transition from 28.5 to 25 degrees.

Machining marks are good and preferred over an excessive polished blade.

The “underside of the flatten” 2mm.

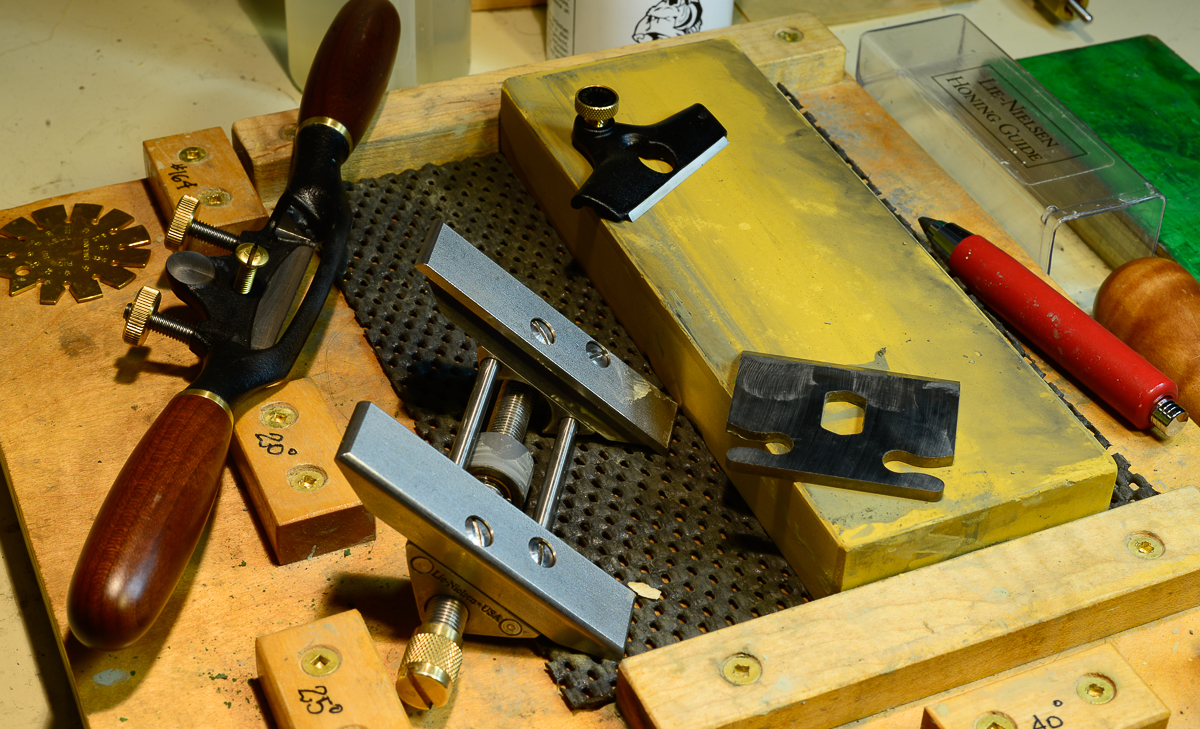
The chisels on my bench, but more about my sharpening tools in my next blog.
.
